The Multi Installation Ways of Inline Duct Fans
What Is an Inline Duct Fan and How Does It Work?
These fans are spherical and are used to cover one ductwork section. As a result, your HVAC ducting will need to be worked on and exposed to install inline duct fans. Depending on the unit, some may be plugged in, while others require hardwiring and a relay to notify the furnace to turn on and off. As a result, an electrician may be necessary for installation in some cases. Know the form and size of your ductwork before making a purchase. This guarantees that you get the right size unit. These fans produce a quieter result than the register booster fans when the installation is complete.
What is the difference between the standard exhaust fan and the inline exhaust fan?
The conventional exhaust fan is situated just above the ceiling, with an intake vent cut into the ceiling below and a roof-mounted outlet. Suction is created by the fan, which pushes air up via the downward vent. The fan draws the air, which then blows it out the opposite end toward the roof vent, where it is discharged from the house. Standard exhaust fans are available with light kits as an extra design feature. On the other hand, the inline exhaust fan functions in the same way as a regular exhaust fan but has a distinct design. The attic joist is where the inline fan is installed. The fan is connected to a ceiling vent via a single duct. From the fan, a duct leads to a roof vent. Air is drawn into the fan by a duct attached to the ceiling. The air is then blown into the other duct that links to the roof vent by the fan. This lets the air out of the home.
What are the advantages of inline duct fans?
Those who use inline duct fans over ordinary booster fans enjoy several advantages. A few of these advantages are given below.
Several Points of Entry
Do you have rooms with a lot of space? Are you attempting to control the temperature in multiple rooms? Inline duct fans are instrumental in this situation. You can have two distinct intake points in a room with considerable space. Using a Y Junction, your inline duct fan may have many outputs or inlets.
There is less noise
When ordinary booster fans are turned on, their noise is audible right away. They're easily heard and might be irritating at times. Noise is no longer an issue with inline duct fans. They aren't close to the room they are utilized for because they are positioned within the ductwork inside the attic area. The fan's noise level is significantly reduced as a result of this. Noise will be essentially non-existent for people with well-insulated roofs. There's no reason to be concerned if your roof's insulation isn't up to par. Other quiet ones on the market eliminate the noise.
The length of the duct run
Inline fans are a better alternative for connecting the extraction point to the outlet if these two places are far apart since they function with your ducting. A typical booster fan, for example, will not be the most excellent choice if you need to connect the fan from your guestroom to your roof vent over a long distance. Because of its flexibility to operate with ducting, the inline duct fan is also excellent for subfloor ventilation and heat transmission.
More strength
Inline duct fans, unlike typical booster fans, may be equipped with high-capacity motors and available in various sizes.
How to install an inline duct fan
The process for installing an inline duct fan differs based on the manufacturer, model, and overall fan features in question. As a result, thorough instructions are given alongside the fan to ensure that everything is done correctly. Below are some of the ways to install an inline duct fan, be it at the home, office, school, hotel, clubhouse, hospital, subway, among other places:
The General Basic Installation Procedure
Duct inline fans are attached within the ductwork at the appropriate location to offer the required airflow or outflow capability, as per the general installation approach. As a result, the first step is determining which section of the duct will have the fan. The conduit must be cut open to allow the fan if the desired placement isn't directly within the section at one side of the duct run. The installer must ensure that the fan is oriented in the proper direction when installing it.
Whether an inline duct fan is labeled as an "intake" or "exhaust" fan, they may all be put in either direction. As a result, it's critical to pay close attention to how it's installed. Ensure the ductwork fan is adequately supported. Since the fan will be replacing a duct segment rather than using the conduit to sustain it, this may need support or structure. The ends of the duct should be connected to the fan. Strapping it on is usually the best option, but with adaptable duct systems, you will need to build support first and use duct tape to link each end to the ducting.
The next step is to connect the electrical components. This is what provides the fan its power and range. Ensure that the energy going to the fan is the same as what it's rated for. It may otherwise be blown out or spark a fire. An electrician usually does this. Consult an electrical business service if your organization does not have one on board. If you opt to do it personally, be sure you follow all design rules and safety precautions.
From the general installation procedure of the standard inline duct fan, you can learn that you need to repeat the process a couple more times to make a multi-room inline duct fan, but there is a catch to it!
The inline fans provide many solutions for small and large ventilation systems.
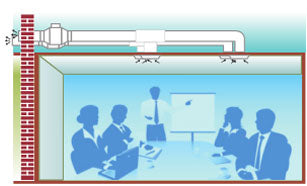
Below are the installation examples of mixed flow inline duct fans.
|
Horizontal installation with a single duct fan |
Horizontal installation with two duct fans |
Vertical installation with a single duct fan |
|
|
|
|
|
Reading Room Installation |
Kitchen Installation |
Meeting Room Installation |
|
|
|
|
|
Big Office Installation |
Movie Theatre Installation |
Workshop Installation |
 |
 |
 |
Here is the right way to do your inline duct fan installation
Make a hole in the ceiling
Determine which rooms require exhaust ventilation first. Then, in each room, locate a suitable position for the register. The register should be as far away from the door as practicable. The air will be drawn up into the attic after passing through the door and the entire room.
The Inline Fan should be secured to the Trusses
Then, in the attic area, secure the fan to the trusses. Then climb into the attic and attach the fan to the rafters. To prevent one duct branch from being too short and the other branch from being too lengthy, place the fan in the middle of the room.
Connect the Inline Fan to a Wye Fitting
Attach a sheet metal wye fitting on the fan after being attached to the trusses. If you don't have a wye fitting, you may create a sheet metal box plenum and put a reducer between the wye fitting and the fan.
Connect the C-can Box to the Flex Duct.
Attach the flex duct to the collar of the register c-can plenum. These c-can plenums are available for purchase online, or they may be readily made from a flat sheet of metal. To seal the corners and collar of the box, you might use aluminum foil tape or butyl tape. Fold the flex duct's jacket and insulation back, then slip the core over the c-can collar. Using clean duct tape, secure the core to the collar.
C-can Box should be hung from the ceiling.
When it comes to mounting the c-can to the ceiling, you'll need at least one wooden truss. Technically, the frame should go all the way around the c-can box. The c-can and the register are held on the ceiling by the framework.
Wrap Butyl Tape around the C-can
Use Butyl tape to tape the c-can to the sheetrock to avoid air leaks between the register and the sheetrock.
Connect the Wye Branches to the Duct Flex
Connect the flex duct to the wye fitting now that the c-can is attached to the ceiling using flex duct. The vent should have a smooth radius from the wye fitting to the register c-can.
Install a Backdraft Damper
In front of the inline fan, place the backdraft damper. When the fan is turned on, the backdraft damper opens, and it shuts when the fan is turned off. If you don't have this backdraft damper installed, heated air from the attic will be drawn back into the home when you turn on your central air.
Registers should be installed
When installing the register, start with the side that isn't framed. Ensure that the resister screw is inserted through the metal flap. Then screw in the register's opposite side. Check to see that the register is squared against the wall.
Connect the fan to the switch
You just installed your Hon&Guan inline duct fan!
Sample Block Quote
Nam tempus turpis at metus scelerisque placerat nulla deumantos sollicitudin delos felis. Pellentesque diam dolor an elementum et lobortis at mollis ut risus. Curabitur semper sagittis mino de condimentum.


